Crafty Blogs

Monday, 22 February 2010

Get your free Doodle Sheets here!


Inspired by my previous post, I have created a series of 6 doodle sheets that are free to download.  I have produced them at A5 size (though they could be made smaller or larger if you choose) and they can either be printed off and used as they come, or trimmed and laminated to make re-usable doodle sheets, as illustrated here.  If laminated, they should be used with special dry-wipe pens to allow them to be wiped clean.  I also punched a hole in the corner of each sheet and tied them together using a keyring so that I could carry them about more easily.

You are free to use these however you choose (except commercially of course!)

Get your doodle sheets here:


Hopefully this will work for everyone - I've not used Scribd before, but it seems that this is the generally recommended way of adding a PDF document to your blog.  I've also just realised that I've stupidly made an error with my blog address on the sheets themselves - aaaghh!!! I shall have to see if I can set up a re-direct now.

Friday, 19 February 2010

Oodles of Doodles

Over the following week, I'm going to follow the theme of Doodles or 'playful' drawing. Today, I'm going to do a review of the Doodle Cards produced by Usborne, which I purchased over Christmas. They are part of a wider trend over the last few years which has seen a number of children's books brought out where you are invited to complete a picture, in fact when I started researching this, I was astonished at how many there are, with new titles coming out all the time.  I bought 'The Boys' Doodle Book' for my son, (there is of course also The Girls' Doodle Book ) by Andrew Pinder (Buster Books) but there are lots of others on a range of different themes, including The Art Doodle Book (suitable for older children, as you are invited to complete doodles 'in the style of' some of the great masters'). There are even grown-up versions such as:


      I think these are a terrific idea, much more creative than simple colouring books, in that they encourage children (or adults) to use their imagination and practice their drawing skills in a fun and entertaining way. They are not really suitable for the youngest children, but once they start to get more confident with their drawing (perhaps around school age, but it probably varies a little from child to child) they're ideal. Having said all that, Fisher Price are introducing 'My First Doodle Book' in August this year, which presumably is aimed at younger children.
      Anyway, Usborne have produced their own version of these as part of their Activity Cards series. Instead of a book, Usborne's version is in the form of a range of Doodle Cards on different themes. There are currently 5 different themes, each containing 50 cards of around postcard size, which are presented in a box rather like a pack of playing cards. This makes them ideal for putting in a handbag for 'emergency' use. Unlike many of the books (which I suppose invite you to colour them in as well as drawing) they are colourful and have a wipe clean surface so the cards can be used again and again. Unfortunately the pen that came with my box didn't work, so I had to go out and buy a set of dry wipe pens, but at least that meant there were then a range of colours to use. The themes currently available are: Monster Doodles, Holiday Doodles, Animal Doodles, Travel Doodles, and Christmas Doodles and they sell for around £5.00.

      My verdict on these is that they are yet another great idea from Usborne, that my children enjoy using, and which I can carry around easily while travelling. I suppose my only (slight) critiscism is that their small size does inhibit the creativity somewhat, but then I suppose that's a trade off against them being conveniently handbag sized.

      This is my first 'book' review post. I suspect it won't be my last as I find that I quite enjoy the excuse to browse Amazon (do I really need an excuse?) researching them - though I do find that the temptation to buy books while doing so is very strong. Amazon are clever at suggesting other books you might be interested in, so I have a very long wish list now!

      Tuesday, 16 February 2010

      New Domain Name

      This is just a very brief post to alert everyone to the fact that I now have my own domain name for this blog: www.artful-adventures.co.uk. I'm not sure that this will make any difference whatsoever to anyone following or subscribing, since I am still publishing on Blogger and the new domain just redirects to the Blogger domain anyway, but I thought I'd let everyone know 'just in case'.

      Friday, 12 February 2010

      February Featured Artist

       
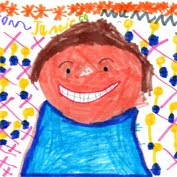
      February's Featured Artist has been contributed by Treaclezoo, and was drawn by her daugher Joy when she was 4 years old - it just goes to show that even those most ephemeral of drawings, created on a 'megasketcher' can be immortalized with a camera.  I can see why this one was recorded for posterity!

      The monthly Featured Artist is selected from images uploaded to the Artful Kids Flickr Group.
      If anyone has any masterpieces (drawings and paintings) created by children under 12 that they would like to contribute to the group, your contributions would be very welcome.

      Friday, 5 February 2010

      Creativity for Boys

      I feel the need to get on my soapbox again - it doesn't happen very often, but increasingly, as the mother of 2 boys, I feel the need to defend their right to be creative, though it seems a little ridiculous that I should feel that way.  Over the Christmas holidays, we took a family visit to the Museum of Science and Industry in Manchester (MOSI).  It's a wonderful free resource, full of steam engines, trains, planes, cars and other bits of technology, and they also have an interactive hands on science gallery specially for kids.  Being the holiday period it was busy, with lots of boys and girls.  While we were there they set up a creative activity to make a decorative snowflake or other decoration, which basically involved lots of glue, scissors and glitter.  As I approached it, my husband said to me 'we've found the girls' table' - and he was right, it was surrounded by about 20 small girls and their mothers, with not a male in sight.  Fortunately this did not put my son off, and he happily approached and got involved, but there were plenty of other boys around in the gallery, and there didn't seem to be anything inherently female about the activity.

      All this got me thinking.  I have already noticed that there seem to be many more creative activity kits out there aimed at girls than there are at boys, and while there is nothing stopping me buying them for a boy, the packaging might put a boy off from using it if he feels it is too girly (boys are often sensitive to these things).  In nursery, creativity does not seem to be gender specific, but once they get a little older it seems that boys, if they are creatively minded, are steered towards model building and science and engineering style projects.  My son once indicated he wanted to learn to knit and sew, and my husband's humorous response to this, was to utter words to the effect of 'over my dead body' - now he wasn't serious, but the comment was made.  If he still wants to learn (he hasn't mentioned it recently) I'll be happy to show him.  Even some of the activity kits which aren't so obviously feminine in nature, are often packaged in a girly way.  The overall impression I get from all this, and which niggles away uncomfortably in the back of my mind is that we are not really encouraging boys to be creative in the way that we encourage girls, and that this is largely an unconscious attitude - the worst kind, because we aren't even aware of it.

      Now I should say at this point, that I am talking very much in general terms.  I know there are some artistic and crafty kits out there aimed at boys, and that art materials are not gender specific, it's just that there seem to be more for girls, and I have yet to see an introductory sewing kit aimed at boys, or even one that is genuinely gender neutral.

      This is not a recent thing - when I was at art college many years ago now, 75% of students on the course were female - and that was for Fine Art - not an especially female subject you'd have thought.  I'm not sure if it would still be the same today, but I suspect it is.  In contrast, if you looked at the most successful visual fine artists of today, I think you'd find that a disproportionately high number would be male.  Maybe that just mirrors lots of other disciplines, where the same thing seems to happen, and is a whole other topic.  It seems that there is a 'science is for boys, arts subjects are for girls' attitude coming into play - an attitude that starts quite early.  So, in the light of all this I think it is important for me to do what I can to encourage artistic creativity in my boys, in whatever form it takes.

      Right, I shall get off my soap box now.  I have no doubt that some of you will think I am talking complete and utter rubbish here, and maybe I am, indeed I hope so, for the sake of male creativity in its widest form!

      Friday, 29 January 2010

      Stained Glass Window Art


      It's been a while since I posted my last tutorial project for fridge frames, so I thought I would offer up this project for a piece of colourful window art. This is a project which needs a laminator to create. I know not every home will have one of these, though the small basic ones are quite cheap these days, and I actually find them quite useful for a whole host of household purposes, ranging from protecting favourite recipes and knitting patterns, to creating notices and labels, and last but most definitely not least, for creative projects like this one.  My laminator is a Fellowes Saturn A4 model - not the cheapest, and not the most expensive, but I've been very happy with it.

      Even small children can take part in this activity, as long as the actual laminating and cutting of the window mount is undertaken by an adult.

      You will need…..

       
      • Laminator
      • Laminator pouches (thickness doesn’t really matter here)
      • Variety of coloured tissue paper
      • Scissors
      • Craft Knife
      • Ruler
      • Black card
      • Sticky Tape
      Method

      1. Cut or tear a variety of small pieces of tissue paper.

      2. Open the laminator pouch, and carefully arrange the pieces of tissue paper on the plastic. It doesn’t matter if they overlap, since this just creates a more interesting result as the colours mix together. Try as far as possible, to make sure that the paper doesn’t spill over the edges of the pouch. Don’t be too precise about where the tissue is placed, as it tends to move a bit when you place it in the laminator anyway!


      3. Carefully close the pouch over the tissue paper.

      4. Heat the laminator up - if there is more than one setting, make sure you use the correct one for the thickness of plastic that you are using.

      5. Carefully holding the edges of the closed pouch, feed it into the machine - sometimes it helps if you support it on a piece of card the same size as the pouch, sliding it off the card and into the laminator.


      6. Take a piece of black card, the same size or larger than the your laminated sheet. Using a craft knife and ruler, cut a window slightly smaller than the laminated sheet.  Obviously this would have to be done by an adult.


      7. Use the sticky tape to attach your laminated sheet to the reverse of the frame.


      8. The framed sheet can then be blu-tacked to a window to display the full effect.

      Friday, 22 January 2010

      Art Materials - Kicking off with Canvas

      `


      I am introducing a new regular informative series to Artful Adventures on the subject of Art materials - I'm not sure yet quite how regular this will be, but there are lots of art materials out there, with new ones being introduced all the time so there's plenty of material to go at (no pun intended).  I thought I'd kick off with canvas, the most traditional ground for painting, which has undergone such a surge of popularity in recent years.

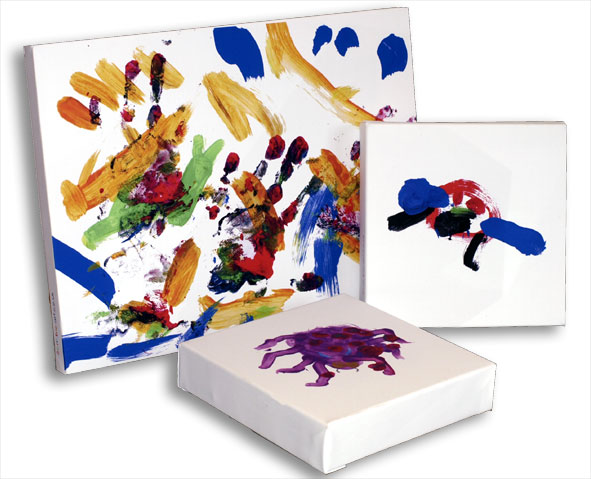
      Canvas, when used as a support for painting, is usually stretched tightly across a wooden stretcher.  Traditionally, these canvases were then framed, though the fashion today is usually to leave them unframed.  Because it was a linen or cotton canvas (the old masters often used hemp which is no longer available) a natural material which will absorb moisture from the air and lose tension over time, canvases were designed to have the capacity to be tightened further at a later date by knocking in small wedges to the corner joints at the rear of the canvas.   Following stretching, the traditional manufacture of a stretched canvas involves painting a coating of glue size over the natural canvas fabric, followed by several coats of primer.  This is to prevent the paint soaking into the material which can ultimately cause it to rot over time.  The primer also gives a bright white background to paint on, giving subsequent paint layers greater brightness and luminosity.  It can also give a smoother surface, though part of the attraction of canvas today is its textural quality.  The disadvantage of canvases, especially large ones, apart from the tendency to sag over time, is that they can warp or twist.  The quality of the stretcher itself is therefore important.  The wood needs to be strong and well-seasoned and the frame needs to have enough bracing to prevent distortion.  Lots of this I have learned by experience - I now only buy quality stretchers for Artful Kids, and have moved to using a polyester based canvas for printing which is less prone to sagging, as it does not absorb moisture.  For painting, the best quality canvases are made using linen, but this is quite expensive, so most of what is available cheaply and ready made will be cotton, though this is less stable and can be prone to mildew.

      As with most things, you can make your own canvases from scratch - I was taught how to do this at art school, but my canvases always seemed to be a bit skew-wiff (I don't have brilliant woodworking skills). However if you are after a size of canvas that is not easily available, you can buy the stretcher bars and braces separately (with pre-cut joints), knock them together and stretch your own.  Getting even tension across a large canvas can be tricky however and takes practice.  For standard and especially smaller sizes, it is generally no cheaper to make your own than to buy ready made, especially if you're not too concerned about the quality.  Buying in bulk also cuts down the cost if you are doing some work with a group of children.

      Of course canvas doesn't have to be stretched, and unstretched it takes on more of the character of a textile hanging - this too has a history.  During the medieval and Tudor periods, if you couldn't afford to have a genuine tapestry on your wall, you'd hang a 'stained' - or painted linen hanging on your wall instead. At a later date painted and stencilled cloths were also used on the floor as an early form of cheap carpet, and the forerunner of linoleum. When painting on unstretched canvas, you have to restrict yourself to thinner layers of paint to prevent cracking and flaking, unless you are using purpose designed fabric paints. 


      The current popularity of canvases means that you can pick up ready stetched and primed canvases pretty cheaply these days, especially in smaller sizes, but though you may occasionally let your children loose on one, it would be extravagant to let young children them use them all the time.  They're good to use for special occasions, and also for those simple but effective techniques where you can't really go wrong, and are most likely to produce an effective result (for example hand and footprints, splatter painting etc) that you intend to hang on a wall.  However, I recently came across a product at the Early Learning Centre which allows your child to paint on canvas on a regular basis, and wash it when you want to use it again.  It did occur to me that as it appeared to be nothing more than a 1m square of canvas fabric that has been hemmed at the edges, this would be very easy to make yourself, but possibly they have treated it in some way to become stain resistant.  (I'm afraid I have an almost reflex action when looking at anything I like, that automatically causes me to consider whether I could make it myself. Being brought up in an 'economically challenged' family was a great stimulus to my creativity!)  The advantage with this is that if your 2 year old does unexpectedly create a masterpiece, you can keep it unwashed and hang it on the wall, or even have it stretched perhaps.  After all for £10 it's not particularly expensive.


      If you want the textured effect of canvas, but are not particularly interested in the bulk of a stretched canvas, then you can buy canvas board- this is essentially a hardboard base with a white primed canvas style surface.  It feels different to paint on, as it does not have the same 'give' or flexibility as a stretched canvas, but at times this might be an advantage. Canvas board has the advantage also that if the size is appropriate, instead of hanging it on the wall, you can add some felt to the back and use it as an artistic place mat. Again you can make your own canvas board much more cheaply, but you have to weigh up whether the extra hassle is worth it.


      For sketches and preliminary work or where you want the effect of canvas without too much hassle or expense, there are the pads or blocks of paper designed for oil and/or acrylic work. Canvas paper has a linen effect texture which can be used quite effectively with pastels, crayons and charcoal as well as with paint.  A sheet can always be mounted or glued onto board if more support is required.

      Finally of course, if all else fails, you can always cheat and ask me to put the masterpiece your child has produced on paper, onto canvas.  This has the added advantage that it will be presented at its best, with all those creases, smudges and tears removed.  Visit Artful Kids for full details.

      This is only intended to be a very basic introduction to canvas as an art material - hopefully I haven't bored everyone rigid, but for anyone with a more serious interest in finding out about canvas as a painting support, there is of course lots more material out there on the internet.  A few examples are given here:

      Making a Hand Made Canvas for Painting on
      How to Prime and Stretch a Canvas
      The Artist's Canvas