Crafty Blogs
Showing posts with label kids. Show all posts

Thursday, 25 March 2010

Artful Kids Competition - win a unique piece of personalised artwork


I have just launched my first competition for Artful Kids, in association with Raring to Go magazine. To take part I am inviting readers of the magazine, and of Artful Adventures, to submit a photo of their children's artwork, which will be turned into a unique, and personalised piece of contemporary canvas wall-art measuring at least 30x30cms and worth a minimum of £85.


This is just one of the options I currently offer at Artful Kids, but it is the most creatively satisfying and challenging for me, as the child's artwork is transformed into something new, while retaining the distinctive feel and integrity of the original.  Every piece is unique, as the approach taken is very much dictated by what the original work inspires.  You can see a few 'before and after' photos here which give you some idea of the wide variety of styles this can result in.  A digital proof is always supplied before production goes ahead, to ensure that the customer is happy with the finished result.


To enter, you need to submit a photograph of your child's artwork, by posting it on your blog and adding your link below. Alternatively you can send your image as a Jpeg to: info@artful-kids.co.uk.  The closing date for all entries is 30th April, and the winning piece of artwork will be selected the following week.

Best of luck!

Monday, 22 March 2010

March Featured Artist

Me riding an Elephant Snake! by Mollimoo1.

This month's Featured Artist has been contributed by Mollimoo, and is by her daughter, aged 3.  The intriguing title of this one is 'Me riding an Elephant Snake!' I think it's quite accomplished for a 3 year old.

The monthly Featured Artist is selected from images uploaded to the Artful Kids Flickr Group.
If anyone has any masterpieces (drawings and paintings) created by children under 12 that they would like to contribute to the group, your contributions would be very welcome.


Wednesday, 17 March 2010

Crayon Cookies


Following on from my last post on wax crayons, I thought I would introduce this project for Crayon Cookies which uses up all those odd bits and pieces of broken crayons that you always end up with.

Method
Remove all the paper from the crayons - I found this was easier if they were soaked in water for a few minutes first.

Using an old muffin tray, divide up the crayons between the different sections.  The advice is to use an old muffin tin, but I thought I could get round this by using muffin cases - wrong!  The wax still got onto the tin, but it did clean up quite easily with soap and really hot water.  You can have great fun at this stage, the kids can get involved, and you can divide the colours out however you like.  I decided to stick to colour families, so I used shades of green in one, shades of blue in another, pinks and purples in a third, and so on. The kids did a couple of 'harlequin' cookies, with a complete mixture of colours.


Place the tin in a warm oven which has been pre-heated to 150 degrees.  As soon as the tin goes in, turn the oven off, and leave the crayons to slowly melt.  It's quite difficult to judge this stage - at the end of the period, not all of my crayons had melted, so I turned the oven on again at a low heat and left it a little longer.  However this resulted in them becoming a little too liquid! Possibly it depends on the performance of your oven.

When they have melted sufficiently for the individual crayons to have 'merged' but with the individual colours remaining distinct, carefully remove the tin from the oven and allow to cool.

I made my crayon cookies standard muffin size, which meant they were quite chunky for little hands to hold as crayons, and I had to cut them into quarters (this does have the advantage that it gives you a good point to use).  If you want to cut them, I found that the easiest way to do it was to heat a good strong cutting knife over the gas flame, and use the hot knife to cut the cookie.  Alternatively you could bake them as mini-muffins if you have the appropriate tin, though I think this would restrict you to only using the thinner crayons.


I can't remember where I came across the idea originally - it was in pre-blogging days, and I didn't take a note of it at the time, but in looking for some detailed insturctions I found this post by Ten Ten  helpful.

Another tutorial by Chica and Jo, uses ice-cube trays with completely melted crayons in individual colours to create a more sophisticated crayon with layers of colour.  They look wonderful, but I decided I didn't have the patience for this.   You can find it here.

Monday, 22 February 2010

Get your free Doodle Sheets here!


Inspired by my previous post, I have created a series of 6 doodle sheets that are free to download.  I have produced them at A5 size (though they could be made smaller or larger if you choose) and they can either be printed off and used as they come, or trimmed and laminated to make re-usable doodle sheets, as illustrated here.  If laminated, they should be used with special dry-wipe pens to allow them to be wiped clean.  I also punched a hole in the corner of each sheet and tied them together using a keyring so that I could carry them about more easily.

You are free to use these however you choose (except commercially of course!)

Get your doodle sheets here:


Hopefully this will work for everyone - I've not used Scribd before, but it seems that this is the generally recommended way of adding a PDF document to your blog.  I've also just realised that I've stupidly made an error with my blog address on the sheets themselves - aaaghh!!! I shall have to see if I can set up a re-direct now.

Friday, 12 February 2010

February Featured Artist

 
February's Featured Artist has been contributed by Treaclezoo, and was drawn by her daugher Joy when she was 4 years old - it just goes to show that even those most ephemeral of drawings, created on a 'megasketcher' can be immortalized with a camera.  I can see why this one was recorded for posterity!

The monthly Featured Artist is selected from images uploaded to the Artful Kids Flickr Group.
If anyone has any masterpieces (drawings and paintings) created by children under 12 that they would like to contribute to the group, your contributions would be very welcome.

Friday, 22 January 2010

Art Materials - Kicking off with Canvas

`


I am introducing a new regular informative series to Artful Adventures on the subject of Art materials - I'm not sure yet quite how regular this will be, but there are lots of art materials out there, with new ones being introduced all the time so there's plenty of material to go at (no pun intended).  I thought I'd kick off with canvas, the most traditional ground for painting, which has undergone such a surge of popularity in recent years.

Canvas, when used as a support for painting, is usually stretched tightly across a wooden stretcher.  Traditionally, these canvases were then framed, though the fashion today is usually to leave them unframed.  Because it was a linen or cotton canvas (the old masters often used hemp which is no longer available) a natural material which will absorb moisture from the air and lose tension over time, canvases were designed to have the capacity to be tightened further at a later date by knocking in small wedges to the corner joints at the rear of the canvas.   Following stretching, the traditional manufacture of a stretched canvas involves painting a coating of glue size over the natural canvas fabric, followed by several coats of primer.  This is to prevent the paint soaking into the material which can ultimately cause it to rot over time.  The primer also gives a bright white background to paint on, giving subsequent paint layers greater brightness and luminosity.  It can also give a smoother surface, though part of the attraction of canvas today is its textural quality.  The disadvantage of canvases, especially large ones, apart from the tendency to sag over time, is that they can warp or twist.  The quality of the stretcher itself is therefore important.  The wood needs to be strong and well-seasoned and the frame needs to have enough bracing to prevent distortion.  Lots of this I have learned by experience - I now only buy quality stretchers for Artful Kids, and have moved to using a polyester based canvas for printing which is less prone to sagging, as it does not absorb moisture.  For painting, the best quality canvases are made using linen, but this is quite expensive, so most of what is available cheaply and ready made will be cotton, though this is less stable and can be prone to mildew.

As with most things, you can make your own canvases from scratch - I was taught how to do this at art school, but my canvases always seemed to be a bit skew-wiff (I don't have brilliant woodworking skills). However if you are after a size of canvas that is not easily available, you can buy the stretcher bars and braces separately (with pre-cut joints), knock them together and stretch your own.  Getting even tension across a large canvas can be tricky however and takes practice.  For standard and especially smaller sizes, it is generally no cheaper to make your own than to buy ready made, especially if you're not too concerned about the quality.  Buying in bulk also cuts down the cost if you are doing some work with a group of children.

Of course canvas doesn't have to be stretched, and unstretched it takes on more of the character of a textile hanging - this too has a history.  During the medieval and Tudor periods, if you couldn't afford to have a genuine tapestry on your wall, you'd hang a 'stained' - or painted linen hanging on your wall instead. At a later date painted and stencilled cloths were also used on the floor as an early form of cheap carpet, and the forerunner of linoleum. When painting on unstretched canvas, you have to restrict yourself to thinner layers of paint to prevent cracking and flaking, unless you are using purpose designed fabric paints. 


The current popularity of canvases means that you can pick up ready stetched and primed canvases pretty cheaply these days, especially in smaller sizes, but though you may occasionally let your children loose on one, it would be extravagant to let young children them use them all the time.  They're good to use for special occasions, and also for those simple but effective techniques where you can't really go wrong, and are most likely to produce an effective result (for example hand and footprints, splatter painting etc) that you intend to hang on a wall.  However, I recently came across a product at the Early Learning Centre which allows your child to paint on canvas on a regular basis, and wash it when you want to use it again.  It did occur to me that as it appeared to be nothing more than a 1m square of canvas fabric that has been hemmed at the edges, this would be very easy to make yourself, but possibly they have treated it in some way to become stain resistant.  (I'm afraid I have an almost reflex action when looking at anything I like, that automatically causes me to consider whether I could make it myself. Being brought up in an 'economically challenged' family was a great stimulus to my creativity!)  The advantage with this is that if your 2 year old does unexpectedly create a masterpiece, you can keep it unwashed and hang it on the wall, or even have it stretched perhaps.  After all for £10 it's not particularly expensive.


If you want the textured effect of canvas, but are not particularly interested in the bulk of a stretched canvas, then you can buy canvas board- this is essentially a hardboard base with a white primed canvas style surface.  It feels different to paint on, as it does not have the same 'give' or flexibility as a stretched canvas, but at times this might be an advantage. Canvas board has the advantage also that if the size is appropriate, instead of hanging it on the wall, you can add some felt to the back and use it as an artistic place mat. Again you can make your own canvas board much more cheaply, but you have to weigh up whether the extra hassle is worth it.


For sketches and preliminary work or where you want the effect of canvas without too much hassle or expense, there are the pads or blocks of paper designed for oil and/or acrylic work. Canvas paper has a linen effect texture which can be used quite effectively with pastels, crayons and charcoal as well as with paint.  A sheet can always be mounted or glued onto board if more support is required.

Finally of course, if all else fails, you can always cheat and ask me to put the masterpiece your child has produced on paper, onto canvas.  This has the added advantage that it will be presented at its best, with all those creases, smudges and tears removed.  Visit Artful Kids for full details.

This is only intended to be a very basic introduction to canvas as an art material - hopefully I haven't bored everyone rigid, but for anyone with a more serious interest in finding out about canvas as a painting support, there is of course lots more material out there on the internet.  A few examples are given here:

Making a Hand Made Canvas for Painting on
How to Prime and Stretch a Canvas
The Artist's Canvas


Monday, 4 January 2010

Creative ways to recycle Christmas Cards

The easiest way to recycle your old Christmas Cards is to take them all down to the nearest recycling point, but there are much more creative ways of recycling them.  Here are a few suggestions:

Cut them along the fold, and use the blank side of each for shopping lists, notes etc. (This is something which my parents always did, and I have adopted the same habit!)

Use the pictures to make gift tags for next year, using decorative cutting scissors to create an attractive edge (again, this is a simple idea that has been around for years, saves money, and takes minimal effort).

Cut up the pictures themselves, and cut out individual motifs and messages to make next year's Christmas cards and gift tags.  This is a little bit more creative, and involves more effort than the one above, but will result in something that is unique, and less obviously recycled from last year's cards.  If you use sticky foam pads or glue dots to stick on the individual elements, it creates an attractive 3D effect which you see on lots of the handmade cards in the shops, and is really simple to do.


Cut out individual characters from the cards (e.g. snowmen, santa, reindeer, robins etc.) and attach them onto the top of a lolly stick with sticky tape to make a simple stick puppet.  If you want to go the whole hog, you could also cut out elements of scenery (trees, houses etc.) from the cards too.  Alternatively you can use these elements to create your own Christmas scene on dark coloured card, and paint on a simple snow background.


Cut up the picture to make a simple Christmas jigsaw.

Cut the picture up into small pieces, (either squares or more random shapes) and use to make mosaic patterns, or collages, as shown here (don't ask about the empty raisin boxes - they wanted to stick them on, so who am I to interfere with their creative innovations?)


The links below give some more ideas:


Let me know if you have any other creative ways of using old Christmas cards!

Thursday, 24 December 2009

Display Ideas No. 4

Artwork Hanging System


And finally... For my last post of 2009 I'm sharing a display idea which I found over at the Madhouse. It's basically an improved version of the old 'washing-line' display, but I think looks much neater and smarter, as it uses metal tension wires and clips (the kind you can get for hanging curtains).  It's really simple and effective, and you can change the pictures so easily.

Wednesday, 23 December 2009

Display Ideas No.3

RIBBA Picture Ledge - IKEA


I came across this idea, or more accurately 2 ideas, at Ikea.  Again, they're really simple and effective, like all the best ideas, and they don't cost a great deal.  The first is the RIBBA picture ledge.  This is a narrow shelf (available in white or black and in a variety of lengths) which is specifically intended for pictures in frames to sit on, propped against the wall.  A small retaining edge on the shelf ensures that the frames don't slide off.  It's a very flexible way of displaying pictures, which can be changed really easily without having to knock nails or pins in the wall.  You can use just a single shelf as shown here, or several at different heights, and of course it's not just suitable for displaying kids artwork, but can be used for any framed picture. I really like this idea, and intend to use it myself, though I'm a bit concerned about my ability to put it up straight!


I was really pleased when I came across this photo, as it combined in one image the 2 ideas from Ikea that I wanted to share. The second idea uses the simple, cheap, colourful frames that Ikea produce, to create a colourful display of kids artwork.  The NYTTJA frames are available in a variety of sizes and bright colours, with plastic glazing which is much safer for kids rooms.  Used together, either on a picture ledge as shown here, or grouped together on a wall, I think they create a really striking display.


Monday, 21 December 2009

Display Ideas No.1

Inflatable Masterpiece Frame

This week, on the run up to Christmas I thought I'd do a completely unseasonal series of mini-posts on display ideas for kids artwork. The first is an item I spotted while out and about last week. The 'Instant Masterpiece' is an inflatable gilt frame for displaying photos, paintings, whatever you want really.  It will display images of up to 10x8".  I haven't tried it out myself, but I thought for just £4.79, it was quite a fun idea for displaying kids artwork.  Anyway if anyone fancies it, it's available here from Amazon.

Wednesday, 9 December 2009

Child Art Prodigies

Everyone loves the naivety and immediacy of children’s art, and will often joke that it is indistinguishable from the work of some well-known artists.  But what if your child seems to have a genuine talent, what if in fact they appear to be a child prodigy?

The term 'child prodigy' is given to a child who is capable of excelling in at least one area of skill, at a level that is considered to be that of a highly trained adult in that field.  Child art prodigies are relatively rare.  There have been some well-documented cases throughout the history of art, including Leonardo da Vinci, and Picasso (who painted ‘The Picador’ at the age of just 8), but many of these did not display ‘adult’ levels of skill until they were a little older, for example John Everett Millais, who entered the Royal Academy Schools at the age of 11, and JMW Turner who was elected as a member of the Royal Academy itself at the age of just 15. (John Constable didn't achieve this until he was 52). This was perhaps inevitable at a time when representational art, in the western world at least, was pretty much universal.  However with the advent of abstract art, and expressionist art in particular, child prodigies have got ever younger, and 2 - 4 years old appears to be the age at which any self-respecting child art prodigy has their first exhibition these days.

One of the most well-known examples is that of Marla Olmstead, who sold her first painting for $253 at the age of 2.  Since then, some of her paintings have been sold for many thousands of dollars.  Some art critics think that she has an impressive ability to paint in layers, and fill the canvas instead of painting in one layer and leaving most of the canvas blank (I’m not too sure that this is especially rare - certainly my 3 year old does this, but then maybe it’s because I give him small pieces of paper instead of large canvases!)  Marla is from an artistic family, but there is a certain amount of controversy about her work, with some critics suggesting that what she does is no more than most children of her age would achieve if they had some additional coaching.

A more recent case which sprang up in Australia earlier this year, is that of Aelita Andre - another 2 year old toddler whose abstract artwork has been selling for between $240-$1400.  Again, there is some debate as to whether it is all her own work (her parents are both artists) though her parents insist that it is.  When her work was first selected for exhibition, her parents apparently neglected to tell the gallery owner that the work was by their 2 year old daughter.  Perhaps that wasn’t important, after all the work did sell. You can see more of Aelita's work at her website.


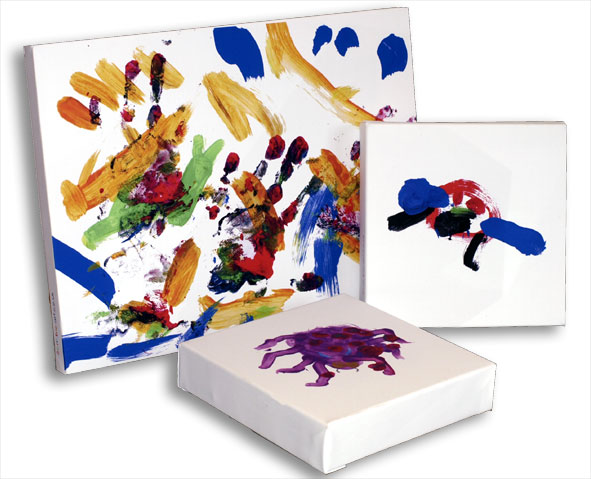
Along with all the hype, there have been accusations of child exploitation.  I must admit I was tempted to try this the other day when my 3 year old produced a beautiful abstract painting, all swirls of gorgeous colour which any professional artist would have been proud of.   For a brief moment I toyed with the idea of passing it off as my own, and selling it for vast sums of money, but for him it was a work in progress, and although I tried to persuade him to stop there and then, the ‘less is more’ argument cut no ice, and I had to watch in distress as he turned it to mud - it was after all his painting.  However it hasn’t stopped me using some of my elder son’s drawings on some of the nursery artwork I sell (he takes a fee for this!)  They lend a wonderful naïve charm, and he’s happy enough to produce them.  I fear neither of us are going to get rich though.  These were however one of the catalysts behind the development of Artful Kids.  After all, any child’s drawing can be used, and I figured it would be a lovely way for an older sibling to get involved with helping to decorate a younger child’s bedroom.


My own feeling is that the significant thing with these very early ‘prodigies’ is that these are children who are given acrylic paints, large canvases, and the support and encouragement of their artistically trained or educated parents.  This by itself would make such children unusual, add this to a little natural talent, some marketing and PR, and hey presto, you have a ‘prodigy’.  This is not to belittle any skill that they do have, but child prodigies rarely become adult geniuses - what gets the attention of the media, is  the young age of the child more than the quality of the artwork itself, and as with most aspects of normal child development, eventually many of their peers will catch up, or even overtake.

There is a danger that the parents of such children put their own needs first, massaging their egos through reflected glory, rather than considering the effect that all the attention may have on the young child, and what might happen when that attention goes away, as it inevitably will.  Having said all that, Marla Olmstead is still painting and selling her work at the age of 9 - but only time will tell if she will be as famous as an adult artist, as she has been as a child.  You can judge her work for yourself on her website 

You can read  another of my posts about Child Art Prodigies here.

Flickr Photo Credits:

Monday, 12 October 2009

Storing kids artwork - just where do you keep it all?

I can't believe it's a week since my last post - the time just goes so quickly! This week I have decided to look at a few products available for displaying and storing kids artwork - it's something which I will introduce from time to time as I see them, but given the relative rarity of such products, it probably won't be too frequent. It's amazing how many products are out there for kids arts and crafts - thousands of brilliant ideas which you could spend a fortune on, but it seems there's not quite so much out there for displaying and storing the finished product.


A4 Picture Pockets


This giant PVC picture holder has 9 pockets for 18 A4 -sized artworks, and is a simple way to display kids artwork and keep it clean. It is available for £15.00 from Aspace


Children's Art Portfolios


Not something that you see very often, Letterbox have a number of kids portfolios available which offer a special and attractive way of storing their artwork.

The simplest traditional style folios, at just £6.99 are illustrated with a choice of 3 different themes, and tied with ribbons. They can store artwork up to A3 in size.


They also have a more expensive filing system version which can be personalised with a photograph. With a carry handle and 9 expandable pockets, it will accomodate artwork up to A3 in size, and is available for £16.99.


However, if A3 is too small, and your child is producing larger masterpieces, then you may need to consider these heavy-duty polypropylene art folders which will accommodate artwork up to A2 in size. Available in pink or blue for £13.00 from the Great Little Trading Company.


Alternatively of course, you could always create your own art storage system for A4 work, by decorating and personalising your own ring binder with loose leaf plastic pocket inserts. In fact I might just go and do that!!


And Finally....

A late addition, which I have just seen, and which seems appropriate for here, is another storage idea for kids artwork which Vertbaudet have to offer. This Drawing Tidy offers 4 stacked compartments for storing and sorting drawings. It is fixed to the wall, and is 35 cms wide. It is currently available for £39.00.


Needless to say, if anyone else out there has come across any other products, or brilliant ideas for storing and displaying kids artwork, please feel free to share them!